
Temenos Lifecycle Management Suite - Collection Product Guide
Letters and Forms: Send Letters with Roles
| Administrator Guide > Examples > Letters and Forms: Send Letters with Roles |
This example is helpful to both system administrators and end-users.
This example is to provide end-users with a business case scenario of how letters function in the Account Servicing moduels, and the expected results when a letter is sent with assigned roles. At the end of this example, the end user should be able to understand why a certain amount of letters were sent even if a user has multiple roles on many accounts.
John is a representaive at Temenos Federal Credit Union. He is working a person's account, Audrey, who is delinquent on several accounts at the institution. An administrator at the institution has incorporated a pre-built letter template into a send letter workflow step that John can run to send the letter out to the appropriate roles on the accounts. The following criterion has been set on the letter:
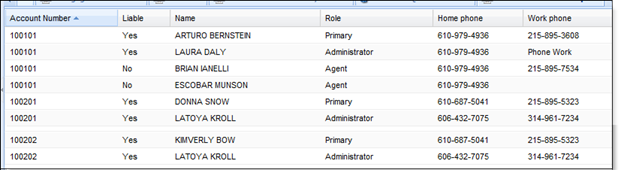
Prior to running the workflow, John pulls up the Account Relationship screen and sees there are multiple people that have roles associated to Audrey's accounts. Since John has been trying to get in touch of Audrey multiple times on all of her delinquent accounts, he determines that he wants to send a letter not only for the delinquent mortgage account he is on (100101) but also her delinquent auto accounts (100201 and 100202). John also wants to ensure those individuals that have roles associated to the account are notified.
 |
Take note that Latoya has a role on two of Audrey's accounts. How many letters do you think Latoya receives? |
John opens the Workflows menu in the left navigation panel and selects "TEM DQ Letter" from the list of available workflows.
The workflow appears in his workspace.
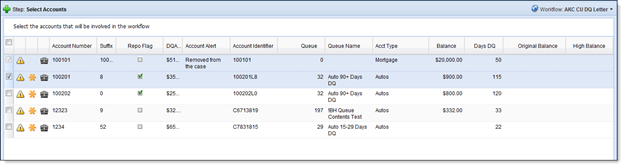
Because it is a multi-account workflow, he chooses which accounts are included when sending the letter in the Select Accounts workflow step. The account that is open on the person workspace is selected by default (100101). He chooses account number “100201” and "100202" to be included as well. He clicks Go To Next Step to continue the workflow.
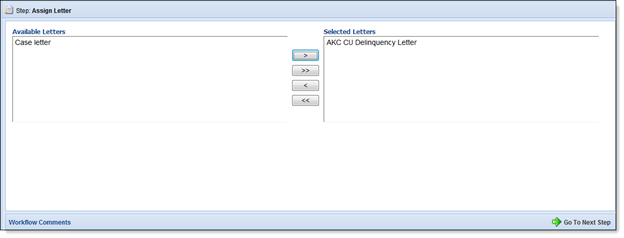
The next step appears in the workspace, and John assigns an available letter. He selects the TEM CU Delinquency Letter from the Available letters box and clicks the > button to add it to the Selected letters box. He clicks Go To Next Step to continue the workflow.
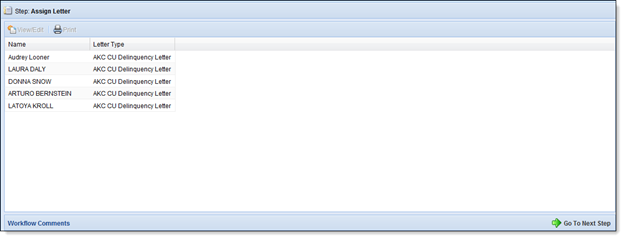
The next step, as part of the “Assign Letter” workflow step, displays who receives the letter based on their relationships to the accounts. John views Audrey's letter to verify that information for each account is displayed on her letter and prints it. He can preview each letter prior to going to the next step by highlighting a person in the list and clicking View/Edit. This opens the letter template and template editor. The template editor contains account related fields and allows John, if he wishes, to add additional fields prior to printing and sending the letter. John views all other letters before he prints him. He stops when he gets to Latoya's preview and realizes she has information regarding two accounts. He then remembers that Latoya was the administrator on two of Audrey's accounts as he sees the information in the letter.
 |
To view relationships on specific accounts, open a specific account in the workspace and open the Account Relationships system screen. |
John may print the letters by highlighting a specific person and clicking Print. It automatically prints to his default printer.